Making a new branch
As part of your learning at Code Your Future, you will be developing lots of projects and backlog tasks. While you’re working on projects you will probably be using branches and PRs. you will be using these in Git and GitHub. Remember: Git is the application that you run on your own machine, which connects to GitHub where code is shared with others.
You might be:
- Forking projects, working in a branch, and submitting finished backlog items as PRs
- Working in a team on a personal project, sharing the work in branches, and reviewing each other’s work with PRs
To make a PR you first need to make a branch and develop some code there.
PRs are made in GitHub.
Branches are made in Git, on your own machine.
To avoid problems, you should only create a new branch when you are on the main branch.
In VS Code
- You are ready to start a new piece of work
- Switch back to the main branch in VS Code by clicking on the branch name
- Create a new branch, named for the thing you are about to work on
- Start editing and making commits
You can see extra guidance for how to manage branches on VS Code here.
If you are working on multiple tasks at once, always check which branch you are currently working in, so you do not commit to the wrong one.
Command line
If you are using the command line, you do it this way:
# move to the right directory
cd your-code-directory

# switch back to the main branch
git switch main

# make a new branch and switch to it
git switch -c your-new-branch-name

# the first time you push on a new branch, tell github you are using a new branch:
git push --set-upstream origin your-new-branch-name

# afterwards you can simply use
git push
Before you make a commit, you can always check which branch you are currently on using the git status or git branch command.
Take care to do this if you are working on multiple tasks at once.
Spotting Problems with Branches
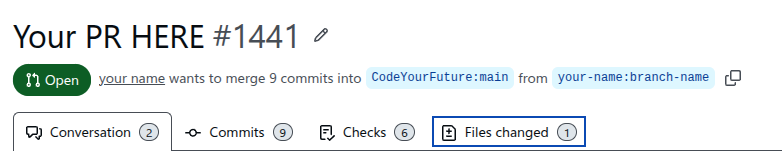
When you are submitting a PR on GitHub, you should always check to see if you received automated feedback from tests or bots.
Sometimes, a bot will leave a comment like this:
The files changed in this PR don't match what is expected for this task.

Please check that you committed the right files for the task, and that there are no accidentally committed files from other sprints.

Please review the 'files changed' tab at the top of the page.

Here is an example of a file that has been incorrectly committed:
The first thing you should do is have a look for the example file given in the files changed tab on your PR. This tab shows you everything you have changed in the branch you are submitting to the PR. You can check it by clicking the link labelled files changed at the top of the page:
Then, have a look at the file tree on the left of the page:
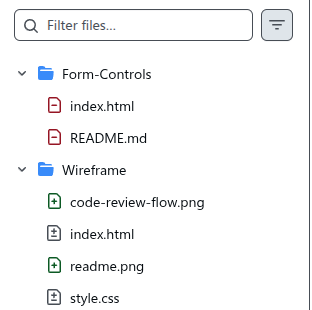
You will see 3 types of file, all of these represent “changes” from the original:
- Files with a green + icon are newly added files
- Files with a red - icon are files you have deleted
- Files with a grey ± icon are files you have made some changes to
Think about the folders these files are in. If the PR you are working on is, for example, a “wireframe” task, you should only be submitting changes in the “wireframe” directory. In the example above, we see changes have been made outside that directory, in the “form controls” directory. This lets us know that something has not been committed in the right place.
Your own personal projects may not have a bot to check this, so it is worth double-checking the files changed tab yourself when you make a PR to ensure only the right changes are being submitted.
Read on to learn how to resolve this problem:
Fixing a branch which changed the wrong files
The most common cause of branches having the wrong files are:
- You forgot to go back to
mainbefore branching - You were working on multiple tasks and forgot to switch branch
To solve the problem, what we want to do is put the files back the way they were originally, before you made the changes. This is called “reverting”. There are several ways to do this with git and VS code, the simplest one requires you to use the terminal.
Using the terminal
- Identify which branches are your “original branch”, and which one is your “pr branch” with changes
- For this example, we will imagine the original is
mainand the pr branch iswireframe
- For this example, we will imagine the original is
- Identify which directory or file has the incorrectly changed files we want to revert
- For this example, we will be reverting the
Form-Controls/directory, which includes all files inside it
- For this example, we will be reverting the
- Open the terminal in VS Code
- Check you are in the right directory where your code exists
- Go to the branch by typing
git switch wireframe - Check out all the original files using this command:
git checkout main Form-Control- This tells git to look at the main branch, and check out every file in the Form-Control directory, into the current wireframe branch
You now need to re-commit the original files and push them. You can do this the normal way in VS Code, or in the command line. Once you have done these steps, go back to the PR page on GitHub and check the “files changed” tab. It should no longer show the incorrectly changed files and only have the ones you intended.
You can also use this technique if you were working on multiple tasks in different branches and incorrectly committed to the wrong branch.
To do this, swap around the main and wireframe in the above instructions to match whichever branch you are currently on, and which one you want to check files out from.